Showing posts with label Pallet Wood. Show all posts

Tuesday, August 28, 2018

Another Dang Year Went....Just Like That!!!!

Pin It


How in the heck did all this time get by me!?!?! Anyway, LOTS have happened between now and then. Here's the rundown in no particular order:


Music tree for a Christmas Tree in 2017
I had the grand idea over this summer to build an outdoor patio/theater.
My minions at work!! BWAHAHA!! 

I wanted to have planters on the patio so I made them with some of the pallet wood.
Turned out pretty good.
 
And VIOLA!! Here is the finished pallet patio/theater.

I am excited to see what fun we will have here. I still have to get the lights up, but I love it!! We plan to use it also as a stage for out son to have mini concerts. 

This was my post on FB:

I did it!! I have even shocked myself with this one. I built an outdoor ðŸŽ¥ patio near completely out of pallets!! I even included a bar at the last minute because I had some extra supplies.

What have I learned?

1. God gives us all talents and skills. We need to just get out of the way and allow them to be expressed.

2. Pain can be overcome by set goals and desire.

3. One man's trash can be another man's treasure. Thanks for all the pallets.

4. There is absolute beauty all around.

5. Great fence neighbors are GREAT fence neighbors. Thank you Toby for coming to the fence near everyday to give me some girl power encouragement.

6. Frustration is an awesome motivator. I couldn't find anyone to help me till up the piece of land that I was using to build the patio. So instead of being frustrated and angry about that, I got my gold claw and I hand tilled it up myself. Again, my great fence neighbor, Toby, peeked over the fence and encouraged me to keep it going even though I was in a great deal of pain.

7. I have an amazing husband that stands back and allows me to have these crazy ideas and supports me into making them reality...even when he does not understand why I have the desire to do them.

Now, need to buy a projector and some speakers. Already have the lights, just need to put them up. Gotta have a movie night this fall!!

Saturday, March 4, 2017

Be Our Guest...

Pin It


Two years ago we had some guests from Sweden that needed a place to stay while they were visiting. It was a short notice kind of thing and all we had to offer to them was a blow up mattress!! Horrible I know. Anyway, that visit has bothered me and my husband so much that we devised a plan to remodel, in hopes, that if they should ever come to visit us again, we can redeem ourselves.

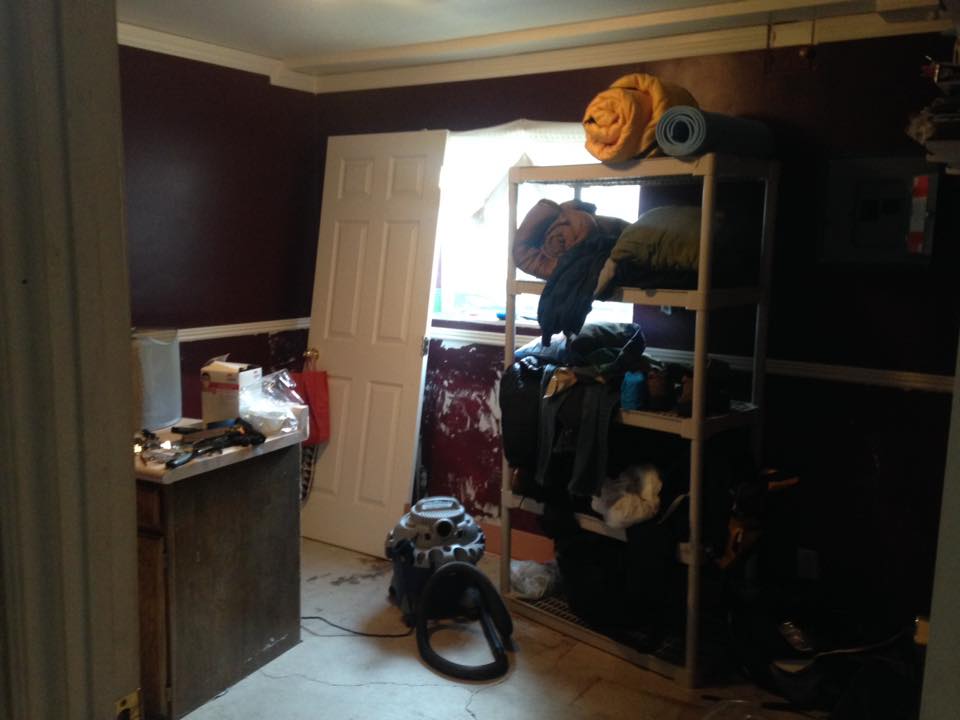
So in the last two years this is what we started with to what we have now.

This was the office. I have no idea why I painted this room so dark. And just be glad you can't see the wallpaper I had up. Horrific!!


My helper was so ready for the change. 


Dont'cha just love paint.
The most expensive thing in the room cost....wait for it....$38!!! I either made my furniture pieces or got them at a ridiculous discount. Some items were given, but most were made. I am pretty happy about that. 

This wall is my pride and joy. I made everything on it accept for the mirrors.


Most  important message there is....
Now our guests have a decent place to lay their heads and keep their things. It has been a labor of love. Can hardly wait to share with you the transformation of the room our guests slept in. It is completely unrecognizable.

Thank you D & D for coming and opening our eyes to being better hosts.


Saturday, February 4, 2017

I Be Scrappin' Y'all

Pin It


As y'all know, I have been doing some remodeling of our basement. Well, I finished the pallet wall and bench!! It looks GORGEOUS!! Pictures of the completed room when we get the carpet in...Anyway. I had a lot of scrap pieces of wood hanging around and I just felt terrible thinking about just burning it in the fire.  What was I going to do!?!?!

Well, several months ago I got me some burlap and wrote on it and thought I would make a pillow of it and just throw it on my new bed, but that just didn't seem right. So it just hung out in my pile of "stuff". Well, TODAY, I go a itching for creative crafting and this is what came of it. It was a simple project. Steps below. Enjoy.

STEP 1:  I do not have pictures of me writing out the words, but I print out the words and taped them together in the size I wanted. I taped that to our HUGE center bay window and put the burlap on tap. This allowed the light to come through so I could trace it, with a Sharpie on to the burlap. Then I just filled in the word "beautiful" to make it stand out.
Burlap all rolled out and being dry-fit 
Taping down the edges of the burlap will help keep it from bubbling.
STEP 2: Don't mind the our basement floor.  I had some scrap 1/4 inch plywood and I rolled the burlap across it and taped it down. With the extra pieces of scrap pallet wood I dry-fit the boards around the words.

Jigs are AWESOME!!
STEP 3: Once you have the placements of your dry-fit frame, get everything cut down to size.

Power shot Brad nailer
STEP 4:  Now, I do not claim to be the brightest bulb in the box, but I just figured out that my power shot was a brad nailer too!!! That tad bit of information would have come in quit handy when I was putting on my shiplap, but I digress. Turn over your burlap sign and attach it to your pallet wood.

IT'S DONE!!!


I think I am going to love it. I am planning on putting it right over our guestroom bed.


Sunday, September 23, 2012

Pallet Wood Screen Cover Part DUEX

Pin It
I hope you all realize that I am not a professional and that I am going about this probably in the wrongest of wrong ways, but I do my best to get the job done.  Anyway here's the second part of my adventure in creating.

In order to get my wood to the rich darkness I wanted for my case, I had to stain the wood.

Rust-Oleum "Dark Walnut"


Hmmmm....not exactly what I thought it would look like.....
 ....but this is a process.  I ended up putting on a second coat on the reddish door and staining the one I missed (ran our and hubbs went and got me another  BIGGER can).  Once I got them both stained the color I wanted was there, buuuuuuttttt....it dried with a very SHINY lacquer-like sheen.  Not what I wanted!!! So I decided to go with a more rustic look and sand the sheen away..

At this point I have made the "box" and just wanted to see how it will look in the end once I have everything up.  So excited.


This is what it looks like with the sanding and the hardware placed on it .  I love how it came out all old and rustic.

Now that the cabinet is done, the husband has softened and we are getting a big(ger) screen than the 22" that we have, which I think will find a new home in our bedroom...and maybe a baby cabinet all it's own.

Once I had all of this done.  I had to polyurethane it.  Which gave it a rich darkness.  And I got the help of the eldest and the hubbs to get it on the wall.  It took some trial and error, but it is up!! And wouldn't you know....the husband gave in and bought a flat screen to go into it.  YAY!!! 


I love it.....Funny thing, is now that we have the bigger screen no one is watching it. :-S

To see how all this started click here.

Leave me a comment to tell me what you think....good or bad. Thanks.

Friday, September 14, 2012

Pallet Wood Screen Cover

Pin It
My family is pretty practical.  We don't have a lot of this and that  like other family members or neighbors.  For instance we don't have cable or dish  the huge 55" flat screen TV, cell phones, etc, etc.  And I think we are doing just fine without all of that, but yes some of those luxuries would be nice to have.

Recently, "The Husband" and I were chatting about some things we would like to get.  I told him that I would like to have a 40"- 42" flat screen.  He balked at the idea, mainly because a neighbor was robbed of hers (her's was much bigger than what I want).  He said that in order for him to feel good about getting a larger TV (the biggest size we have is 22"), he wants to have a cover over it. 

I've looked high and low for something I would like that would fit in our tiny abode that would also look nice.  There are a lot of things out there, but none of them really suited me.  So  I remembered that a little while ago I had gotten some free pallet wood from some guy.  I gave most of it away, but I had kept these two.


They are in pretty good shape.  While I was on pintrest I came across a post that a lady did a barn door like cover for her flat screen.  I really like it.   Click HERE to see what she did.  Mine isn't as pretty at the moment, but I still like the progress that is coming along.

The hardest thing was removing the slats.  The nails are so rusted and the wood is so dry, but with a little patience and determination I was able to get what I needed.

I made a mess, but so worth it.  Pay no attention to the man in the background.  He was fixing our phone box.
After I had removed all of the slats I had to get them all to measure the same size.  Since I have yet to have the flat screen I just guessed as to what the height of my door should be. 


Here are my doors.  I love em'.

I really like the fact that they are rough and tumble.  Not perfect, chipped and has a hole and old nail marking.  Now all I have to do is get some hardware, sand, stain and seal....oh yeah and finish the box part.  I'm getting excited!!

My only dilemma is that I can decide if I want hinges or somehow make them sliding doors. 

What do you think?  Slides or Hinges.

I'll do another post with the next steps soon.  Click here for Part Duex.
Related Posts Plugin for WordPress, Blogger...